12/26/2014

McKeen coach trailer: update

After reinforcing the sides and ends with resin & glass fibers the windows and doors were cut out


The end steps of the Aristo Sierra coach are a good match for the stairs leading upwards from the center-entrance.

12/24/2014

M-10005's cab interior

Interior is now painted with upholstered seats


12/23/2014

McKeen trailer cars in 1/29

The baggage trailer's sub-construction out of an Aristo Sierra coach (shortened and reduced in width & height, with rounded ends added on both sides; height has to be reduced by another 3/16"):


The coach trailer out of a Bachmann coach (reduced in width & height, with rounded ends added on both sides; in the center there is the provision for the lowered entrance door)


12/16/2014

McKeen motor cars & trailers in 1/29

I really like those early trials of streamlined motor cars built by McKeen.
I intend to built a SP combo (70' McKeen passenger motor car and its 32' baggage trailer) as well as UP's rebuilt (conversion to gas electric) M23 or 24 with thew matching 51' passenger trailer in 1/29 scale.
I started with the 32' baggage trailer, using an Aristo Sierra coach - the trucks closely match the original McKeen.
For the 51' passenger trailer I'll use a Bachmann coach - its trucks closely match the trucks of those car, too.
I'll use the original models' shells as a substructure on the straight sides and add a plastic or cardboard substructure for the rounded ends. Then I will cover the basic shell with glass-fiber layers and resin.

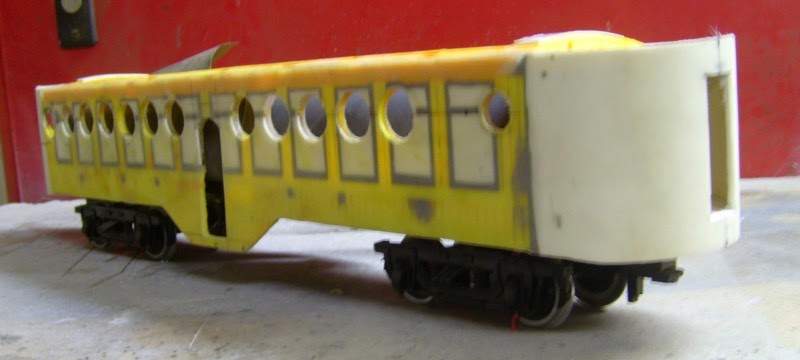
The McKeen motor cars will be built upon shells of Aristo heavy weight cars with additional subconstruction for the knife-sharp or parabolic front and the rounded end.
UP's rebuilt McKeen will get an USA Trains NW2 power block for the front truck, the SP will get the same truck on the rear, making the front truck with its different wheel diameters probably a dummy (or only a single driven axle).

Pictures will follow when I have some basic progress to show...

12/07/2014

M-10005: cab's interior

Some pix of the cab's interior - unfortunately I found only two prototype shots which show only a few parts of the interior. Even whether there were two or three seats cannot be identified. My Overland model shows wrong rear doors (one on each side, whereas the prototype diagrams has a center door only) as well as the prototype shots show seats with folding back without armrests whereas the Overland has non-folding-seats with armrests, no brake stand, no air-shutter control and so on...

So here's my replication with a lot of 'modeler's license':
On the fireman's side there's some air-brake equipment with a releasing handle.
In the center one finds the throttle stand (according to the prototype photos the throttle looked similar to those found in a streetcar). Additionally (partially hidden by the engineer's seat) there's the control for the front shutters behind the front grill (it cannot deny its descent from a steam-engine's throttle). The independent air-brake controllers are located on the engineer's right.
All parts are fixed to the cab's main floor. The front of the cab's floor is slightly raised, with screens on the step covering the cab-heater.


And with engineer & fireman in place


Further parts are mounted in the shell - the cab-signal box in the center and some gauges on the engineer's side.
Fixed to the center pillar are two prominent fans for defrosting/defogging the front windows.


11/02/2014

Update on aux. power-baggage

Some progress to show on the operator's car
It has been fitted with batten and rivets, the lower skirts have been modified and the the parts of the roof now lining up quite well


A short glance on the rivets

A- and B-units' shells now have been fitted with all rivets - I'll post better pictures after reworking of the grill


9/28/2014

Back to the 'Borden's'

I've finished my 1"-scale 'Borden's' milk tank cars (lettering was missing) quite a while ago. Finally here are some pictures of both cars:


7/27/2014

M-10005: ready for rivets

Finally both the A- and B-unit's shells have all the details attached.


7/04/2014

M-10005: A-unit's shell almost finished...

Apart from making new skirts for the B-unit as well as the aux. power car which took considerable time I decided to add L-shaped brass liners at the lower edges of the shells and the skirts' upper edges. The brass liners were countersunk so there are a smooth, sharped edges which can take some impact before a damage will occur. Nothing of a 'highlight' to show but necessary according to my experiences on handling the models.
Finally there is some obvious progress to show of the A-unit:
- the battens were applied
- handrails & steps were built and attached
- the front 'shield' and the logos on the nose's sides were constructed and attached


The B-unit's shell still has to be sand before battens, handrails and steps can be mounted.
Additionally I have to decide which size (head diameter) and material of rivets are appropriate (also considering the costs)- I estimate app. 5000 or so will have to be applied to each shell.

Meanwhile the aux.power-baggage has been leveled (both parts of the shell were not completely in line but slightly tilted). So finally the roofs could be adapted in line, too (no pictures of this).

3/30/2014

M-10005: A-unit with modified skirts

Eventually I changed my mind and made new skirts - smaller (reaching less downward) than the former design now closer to the prototype (probably one is accustomed to the look of lower skirts and tanks of later E- and F-units). So here's the improved construction:


And from above with the new shape of the front windows


Additionally a picture of the the final look of the trucks with all suspension, swing hangers, brake equipment etc. installed.


2/23/2014

Small update on aux. power baggage car

Although I've spent some effort into the car during January & February only a small progress is visible. The roof's parts are almost without steps at the interfaces.
Skirts have received some glass-fiber layers and a final gel-coat and provisions for three footrests were applied. Bars were applied to the windows and the roof received a muffler & exhaust (located between the radiators) for the virtual diesels inside.


1/06/2014

M-10005 - Air-brake cylinders on trucks

The four (non-functional) air-brake cylinders per truck  as well as the accompanying two pistons per cylinder (one on each side) were attached to the trucks.


1/04/2014

A-unit's front window modification

Comparison of the original shape (upper outside edge)


with the shape of the model


reveals that the radius has been too small (ok, the upper part of the frame should incorporate a slight bow, which had been on the loose frame itself but mystically vanished when it was fitted into the shell - now it's too late to correct)
The difference in the edge's radius was corrected - looks more prototypically now


Additionally brass L-sections were applied to shells' ends of the units' shells in order to get sharp, impact-resistant edges.


1/01/2014

Progress on aux.power-baggage

The details on the front-part of the car's roof (intakes, exhausts, radiators etc.) were applied:


Unfortunately the roughly finished lower skirting interferes with the shell, so the two shells as well as the parts of the roof do not line up very well (there a 'step' from the front to the middle part of the roof).

The skirting currently consists of a rounded 1/10" steel plate (a refurbished oven's tube):


So that's the current look from the side: